
First of all, I should let y'all know that this post is also appearing on IKEA Houston's new website, Inspiring Life at Home! Feel free to click on over and check it out!
We’ve been working
on redecorating our bedroom. I love the Pottery Barn quilt and Ikea duvet
that are on the bed, as well as the new pillows from HomeGoods and Pottery
Barn, but I felt like something was missing.

Lucky for me, our Ikea duvet came with a couple of pillow shams, which I don’t
need. So, I cut them up and made a couple 18”x18” pillows to match the duvet!

Whenever I make pillows, I always use the same
“envelope-type” method. It’s SUPER easy, and you can make pillows out of
anything (Ikea pillow shams, bedsheets, tablecloths, curtains, t-shirts,
whatever!). No hand-stitching, no fiber fill stuffing, and no frustration
required!
Here’s all you need for this project:
1. A pillow form in the size you want
2. Fabric scissors and a ruler OR a rotary cutter, sewing
ruler, and self-healing mat
3. Enough fabric for one square piece and two rectangular
pieces in the correct size
4. Matching thread

Here are the fabric pieces you’ll need, depending on your
pillow size:
20”x20” pillow: one 20.5”x20.5” piece, two 20.5”x14.5”
pieces
18”x18” pillow: one 18.5”x18.5” piece, two 18.5”x13.5”
pieces
16”x16” pillow: one 16.5”x16.5” piece, two 16.5”x12.5”
pieces
Those are the main pillow sizes, but if you have some other
size, just do the same sort of math to figure it out. I was using the Ikea
pillow shams, so I couldn’t go any bigger than an 18”x18” pillow (which was
perfect for what I needed anyway).

First, you’ll need to cut your fabric pieces out. You can do
this with a self-healing mat and sewing ruler and rotary cutter, or you can
just use a regular ruler to lightly trace the shape with a pencil on the back
of the fabric, then cut it out with fabric scissors. You’ll end up with one
square piece and two rectangle pieces.

Now you’re going to sew one edge of your two rectangle
pieces. These will end up being the opening for the back of the pillow.
On the long edge of each rectangle piece, fold the fabric
down about ¼”. You can iron the
seam to make it super-neat, but I never do and it always ends up fine.
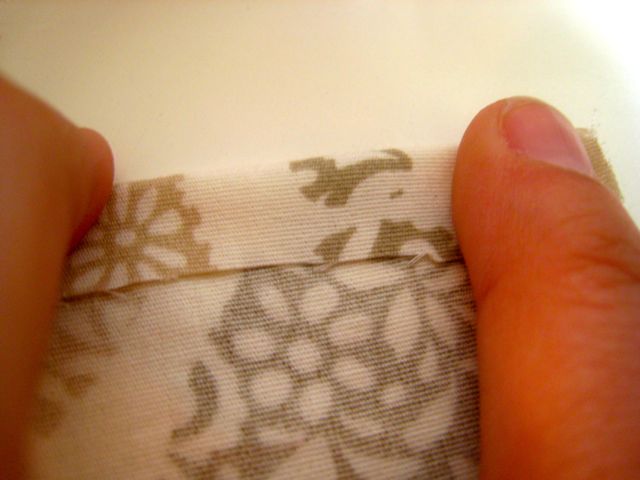
Fold it over again another ¼” so you get a nice clean edge.
Pin the fold down.

Sew a simple straight stitch all the way across (I just line the finished edge
up with the right edge of my presser foot) to secure the fold. Do this for both
of your rectangle pieces.

You’ll end up with a nice, clean edge on your rectangle
pieces.

Once your rectangle pieces are finished on one edge, you can put together the
pillow cover. Lay your big square piece of fabric down, pretty side up.

Now put one rectangle piece on top of it, pretty side down,
and line up the unfinished edge with the top edge of the square piece.

Now put the second rectangle piece on top, pretty side down, and line up the
unfinished edge with the bottom edge of the square piece. Pin the edges all the
way around.

Now, just sew all the way around the square with a ½” seam. So
simple, right? You’ll end up with a nice sewn square pillow cover!

Trim the excess fabric at the corners so there isn’t much fabric past the seam.
This will help your corners look crisp once you turn the cover right-side-out.

Now flip the cover so it’s right-side-out, and you’re done!

Just stuff your pillow form into the cover, and you’ve got a pillow!


These pillow covers can easily be removed for laundering or
replaced when your style changes. I sometimes even replace my pillow covers
temporarily with something more festive when decorating for the holidays! For
now though, I’m just thrilled with the new addition to our bedroom!

I received an IKEA Gift Card in return for this post. All opinions on the product and company are that of my own.
No comments:
Post a Comment