Wednesday, September 29, 2010

Baking Bread is Not-So-Scary

I've always had glorious dreams that one day I would bake all of my bread from scratch and never buy the grocery store stuff. I promised Jeff that way in the future, when I'm a stay-at-home mommy and all, I'll bake bread for our family and our kids will take the homemade stuff to school with their PB&J.

But the thought of waiting until then was just unbearable, and I've somehow managed to find some time in the last couple of weeks to bake a few loaves. I started with the easy-quick-bread-no-yeast-required kind (because OMG yeast breads are intimidating!!).

Spiced Applesauce Bread (because we had a TON of applesauce left over from Jeff's wisdom teeth surgery):


Recipe adapted from here.

1 1/2 cups cinnamon applesauce
1 cup brown sugar
1/4 cup vegetable oil
2 eggs
3 tablespoons milk
2 cups all-purpose flour
1 teaspoon baking soda
1/2 teaspoon baking powder
2 teaspoon ground cinnamon
3/4 teaspoon ground nutmeg
1/2 teaspoon ground allspice
1/4 teaspoon salt
1/2 cup chopped pecans


  1. Preheat oven to 350 degrees F (175 degrees C). Lightly grease a 9x5 inch loaf pan.
  2. In a large bowl, combine the applesauce, sugar, oil, eggs and milk; beat well. Sift in the flour, baking soda, baking powder, cinnamon, nutmeg, allspice and salt; stir until smooth. Fold in the pecans. Pour batter into prepared loaf pan. Sprinkle with brown sugar and cinnamon (this will give it a nice sweet crust).
  3. Bake in preheated oven for 70 minutes, or until a toothpick inserted into center of the loaf comes out clean.


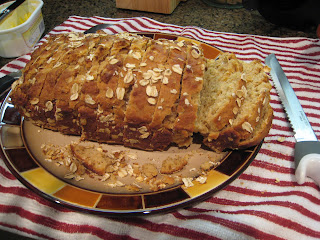
Honey Oat Quick Bread:


Recipe adapted from here.


1 cup plus 2 tablespoons old-fashioned oats (not the instant kind!)
2 1/3 cups white whole-wheat flour
2 1/4 teaspoons baking powder
1/4 teaspoon baking soda
1 teaspoon salt
8 ounces plain yogurt
1 large egg
1/4 cup canola oil
1/4 cup clover honey, or other mild honey
3/4 cup milk 


Preheat oven to 375°F. Spray a 9x5 loaf pan with cooking spray. Sprinkle 1 tablespoon oats in the pan. Tip the pan back and forth to coat the sides and bottom with oats.

Stir together the flour, baking powder, baking soda and salt in a large bowl. Using a fork, beat the remaining 1 cup oats, yogurt, egg, oil and honey in a medium bowl until well blended. Stir in milk. Gently stir the yogurt mixture into the flour mixture just until thoroughly incorporated but not overmixed (don't overmix or the bread will be tough). Scrape the batter into the pan, spreading evenly to the edges. Sprinkle the remaining 1 tablespoon oats over the top.

Bake the loaf until well browned on top and a toothpick inserted in the center comes out clean, 40 to 50 minutes. (It’s normal for the top to crack.) Let stand in the pan on a wire rack for 15 minutes. Run a table knife around and under the loaf to loosen it and turn it out onto the rack. Let cool until barely warm, about 45 minutes.

Stay tuned for my first ever attempt at yeast and rising and such!

Monday, September 27, 2010

Happy Birthday Spirals & Spatulas!!

So it's a Monday. Sigh.

BUT... it's kind of an exciting Monday because it's the first birthday of Spirals & Spatulas! Happy Birthday little blog. Thanks for aiding me in countless procrastination endeavors, providing a neat little space for wedding inspiration, introducing me to new friends, and teaching this English major a thing or two about writing. You're the best.

Here you go, Spirals & Spatulas! Have a birthday cupcake!

I thought it would be appropriate on my very first blogging anniversary (blogiversary?) to look back on a few of my favorite posts. Many of my readers weren't around when it all started, so these will be brand new to some of you!

I Saw Pac Man Today!!! - One of the million thousand reasons I love Texas A&M University.
There Was a Question, and He Popped It!! - In which I take the LSAT and get engaged all on the same day!
How Bacterial Sinus Infections Remind You What Love Is - Me at my worst. And Jeff at his best.
Here's to Weddings That Aren't "Cool" - One of my favorite wedding planning posts.
My Newest Wedding Vendor - The Dermatologist! - Don't read this if you get queasy easily.
"Look What I Made!" - Place Card Display - My favorite wedding DIY project!

Oh, and in case you're wondering what's coming up...

This week at Spirals & Spatulas...
~ Join me as I chronicle my attempts at making homemade bread for the very first time. With yeast and everything!

~ After some strategic placement of orange candles, a shameless acceptance of the fall decorations my mom was going to throw out, and a shopping spree at Marshalls Home Goods, the apartment is decorated for fall! Pictures to come!

~ Still waiting on my DVD of pro pics from the wedding, but I've seen a lot of the photos, and eeee! The Wedding Week Recaps are coming!

PS - Want some new readers for your blog? Head on over to Mingle Monday!

Wednesday, September 22, 2010

New Home Daydreams

Even though we're just now starting to feel like our apartment is totally settled and decorated sufficiently (speaking of which, I totally need to show y'all the Ikea guest room!), I'm already daydreaming about all the rooms I'll design when we buy a house in 3-5 years.

So far, I know that I want need a pink and black laundry room. You know... something totally Franco-chic and adorable. I think it would make me more willing to do the laundry without complaining.


Like this... but a laundry room instead of a nursery. Haha.

Also, there will hopefully be stripes. Somewhere, somehow. I'm totally hoping for a house with untextured walls to make painting things like stripes easier.


This next one's a little less likely, but also, I want a library. Someday. Ever since I saw Beauty and the Beast for the first time as a kid, I've wanted a library. 

The Beauty and the Beast library. Sigh.

Also I want it to have one of those sliding library ladders.


Also I want a little desk area. Currently our desk/computer area is inside the guest bedroom closet. I'd LOVE to pull the desk out of the closet and put it somewhere with letters like this above it:

So cute! 

Summary: If you're a homeowner, PLEASE paint your laundry room light pink. Just do it.

What's your dream home idea? 

Tuesday, September 21, 2010

Two PERFECT Dessert Recipes!

Okay, I apologize in advance for this post. I'm going to give you two recipes that you're going to really want to make, and neither of them are in any way good for you. Except for maybe in the "Mmmm, I'm filling myself with sugar and it feels good!" way.

I made these with my 10-year-old sister while she was spending the night with us a couple weekends ago. I needed some desserts to take to some dinners with my parents and Jeff's parents, and both of these recipes were huge successes!

Best part about baking: Vintage aprons!!!

First, Oatmeal Fudge Bars. I found this recipe over at Natalie's Killer Cuisine. <-- Clickity click to see the recipe! These were so delicious... sweet and chewy and just the tiniest bit of crunch and cinnamon-yumminess on top. If you make this, make sure you use the lowest heat setting on your stove to melt the chocolate (especially if you have Calphalon pans like me). Burnt chocolate will ruin a dessert!


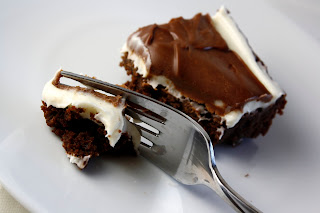
Next up, Cream Cheese Layered Brownies. This recipe was from What Megan's Making. <-- Clickity click for the recipe! These are my new go-to brownies. You know how you always seem to need brownies/cookies/some dessert to take over to someone's house for dinner? These are perfect for that. Tip on this one: Make sure you really let the layers cool in between. We went ahead and used the cooling time to run to Kroger for more cream cheese. I kept these in my fridge and ate teeny tiny bites to make them last longer. :)


I know I have at least a few readers who are amateur/avid/aspiring bakers, so have fun with these recipes! Let me know if you try one of them!

Friday, September 17, 2010

"Look What I Made!" - Family Photo Edition

I so, so badly wanted to have photos from our parents' and grandparents' weddings displayed at our reception. Jeff and I feel really blessed to have families that have set such a wonderful example for us of what a real, loving marriage should be like, and I wanted to acknowledge that at our wedding.

I'm really hoping Kelli got some good photos of the display all set up at the wedding, but for now you'll just have to look at my hastily-snapped shots of the practice set-up at my parents' house.

All of the white frames came from Ross or TJMaxx... major deals!!

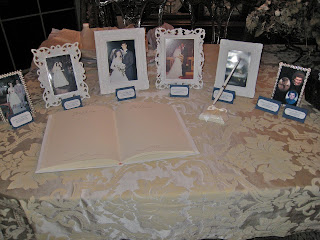
This is a mock-up of everything on my parents' dining room table. We put little labels in front of each frame with names and wedding dates. We didn't have wedding photos for Jeff's grandparents (and step-grandma), so we just used individual photos from the same time period and put them in frames together. They sat behind our guestbook so everyone would see them.

The whole set-up: Guestbook with family photo frames, Guestbook quilt stuff. These were all set up just like this on a counter at the country club's entrance.

I'm SO glad I did this project. It was a little bit of work to get all the photos together, but it was great to have them at the wedding. Even more importantly, I now have copies of all of those photos that I can keep, put up in our home, and one day show our kids. Families really are so, so important, and it makes me happy to have these photographic artifacts from special moments in my family's history.

EDIT: here's what they looked like all set up at our reception:


Thursday, September 16, 2010

"Look What I Made!" - Bathroom Basket Edition

I decided early on in the wedding planning process that I wanted bathroom baskets at the wedding. I figured it would make everyone feel welcome and stuff. The venue's coordinator apparently had never heard of them though... she was awfully confused when I first told her I wanted to put stuff in the bathrooms. Haha.

Our venue actually has two sets of bathrooms, both of which are easily accessible and close to the ballroom. Of course, I didn't find that out until I had already made two baskets, so I had to run back to Target for more supplies and make a second pair!

By the time I made these I was so sick of spending money on things that would get thrown away after the wedding, so I got creative with the baskets to avoid purchasing them...

Women's Restroom #1 - My mom's bread basket!


Women's Restroom #2 - The basket that holds my headbands and hair accessories in my bathroom!


Men's Restroom #1 - A basket from my mom's craft cabinet!


Men's Restroom #2 - A decorative bowl from our Guest Room!

I decorated the bowls with double-faced satin ribbon (which is HUGELY hard to find in navy, as it turns out) and those little bracket frames that I love so much. As for contents, the girls' baskets were way more full than the guys because I figured they'd notice/appreciate it more. I also put maroon candles with navy bows in the girls' bathrooms.

Women's Restroom Contents:
Hair spray
Lotion
Contact Solution
Tampons and Pads
Blotting sheets
Brush
Band-Aids
Q-tips
Tide pen
Advil
Gum & Mints
Floss
Hand Sanitizer
Aerosol deodorant
Tums
Hair elastics
Nail files

Men's Restroom Contents:
Aerosol deodorant
Lint roller
Tums
Gum & Mints
Hand Sanitizer
Contact Solution
Floss
Tide pens

A lot of the stuff from the baskets was used/gone at the end of the night, so I guess the baskets were helpful to some people!

Funny story: At the end of the night as Jeff and I were on our way to the hotel, I realized I had never gone to the bathroom at the reception (weird, right? Especially since there was an open bar that I was utilizing...I guess I was having too much fun to pee?), so I didn't even know if the baskets ever made it to the bathroom counters. So I asked Jeff, and it turns out he never went to the bathroom either. So when we got home from Jamaica I asked my mom how the baskets looked in the bathroom, and guess what... neither my mother nor my father ever went to the bathroom either. It's like we have abnormally huge bladders or something.

Wednesday, September 15, 2010

"Look What I Made!" - Guestbook Quilt Edition

No, I didn't make the guestbook quilt yet (wouldn't that be impressive?!). In fact, I'm not even making it myself... Jeff's mom is making it because she's a quilting genius. BUT, I did make this cute little set-up for the wedding:

Sorry I don't have a finished picture... the frame in the middle ended up being a cute little navy and maroon sign with directions for signing the quilt squares. We put the fabric pens in between the baskets. The left basket says "Blank Squares" and the right one says "Finished Squares," so we put all of the fabric squares on the left and they gradually got moved to the right as people signed them. 

Here's what I've learned so far about guestbook quilts:

1. Stabilize your fabric by ironing it to freezer paper. It makes it easier for people to write on.
2. Use good fabric pens (and put them in an obvious spot so people don't put their ballpoint out of their purse and use that!). Apparently colored ones don't work as well as black, so we used black. 


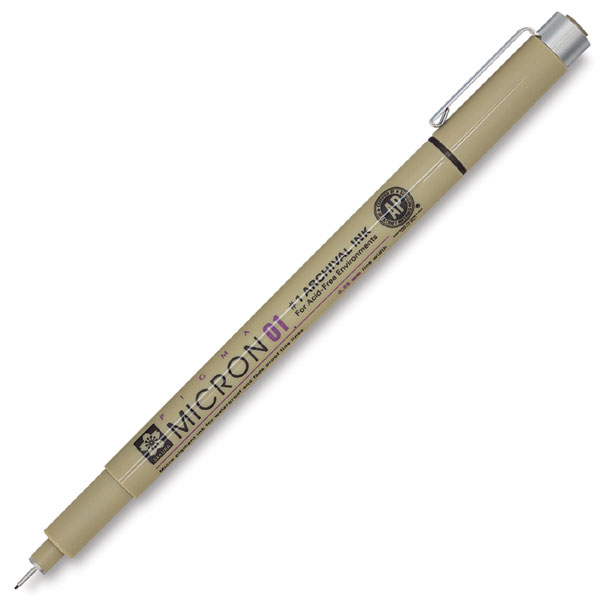
This is what we used - Pigma Micron pens. We tried a few different widths before we found the size that worked just right.

3. Draw a square in washable pen to mark the area that your guests should write in (leave about a 1" border for sewing purposes).
4. If you can give out squares before the wedding (at the rehearsal dinner, showers, etc.), do it! That way you'll prevent huge crowds of people all trying to sign at once at the wedding. 
5. Put a "test fabric" square out for people to try the pens on before they sign an actual square.
6. People will steal your pens. We put out 5 pens at the Rehearsal Dinner and came home with 2. We put out 6 at the wedding and came home with 4. Be prepared.

Jeff's brother had a hard time deciding what to write...
(Picture from Bridesmaid Amy)

But my sister wrote a lot on hers!
(Picture from BM Amy)

Please let me know if you're doing a guestbook quilt and have questions! We mailed a few quilt squares and pens to people who couldn't make it to the wedding so they could sign, and once we get those back my MIL will start piecing it all together! I'm beyond excited!

Monday, September 13, 2010

In Which My Blog Slowly Morphs Into Newlywed Wifery...

This is going to be such a hodge-podge of a post that it isn't even funny. Spirals and Spatulas is having an identity crisis now that the wedding is over, and it's causing me to write strange things. Bear with me.

FIRST TOPIC OF DISCUSSION: I now have 50 followers! Thanks for listening to my silly little posts, guys. Y'all are great. Also you should comment more often and make yourselves known because I kind of feel like you're all stalking me silently. Which is weird.

SECOND TOPIC OF DISCUSSION: I have two excuses for my lack of frequent posting --

1) My wonderful photographer is still working on my professional photos from the wedding. And it's going to be another 2 weeks or so. And I refuse to blog any more about the wedding until I have some photos. So you're gonna have to wait a couple weeks to see it.

2) Law school has taken over my life. If I were Jeff I'd be awfully disappointed that my brand new wife was only fun for two weeks or so, and then turned into a nerdy reads-all-the-time monster who can't speak in clear sentences because her brain is tired all the time.

THIRD TOPIC OF DISCUSSION: Apparently I'm an old married lady.

I've been trying to restrain myself from the non-wedding-related posts until after I finish recapping the wedding, but let's face it... Spirals and Spatulas is inevitably going to turn into a conglomeration of law school complaints, baking recipes, and newlywed-ness eventually. So why hold back, right? In the spirit of all things wife-ish, I have to share something exciting with you all.... I finally realized a life-long dream of using two pie dishes in one evening. TWO!

First was a chicken pot pie, which Jeff and I love-love-loved.

Here's a secret: If you spread egg whites on the top of your pastry before you bake it, it turns out all shiny and pretty like that. Someone once told me this was a total waste of a perfectly good egg. That someone was so, so wrong!

This was from a family recipe, which I will gladly share with you all...

Ingredients:
  • 1 small onion, chopped
  • 1 t chopped garlic [I used minced garlic]
  • 2 T butter
  • 1 rotisserie chicken, deboned and shredded [I used a "savory" chicken from Kroger]
  • 1 bag mixed veggies (cooked) [I used the "California blend" frozen bag of carrots, broccoli, and cauliflower]
  • 1 can cream of mushroom soup
  • 1 can cream of chicken soup
  • garlic and italian seasoning [I used black pepper as well]
  • 2 Pillsbury refrigerated pie crusts
Directions:
Saute the first three ingredients; add chicken, soups, and spices [I put in quite a bit of black pepper, italian seasoning, garlic, and oregano].
Place 1 pie crust in the bottom of a greased pie pan; pour in chicken mixture and top with remaining crust.
Cut slits (or a fun design!) for air vents. [I brushed some egg whites on the top crust as well.]
Bake at 350 for 35 minutes. Let sit for 15 minutes.


See how it was all filled with STUFF rather than GOO? I hate chicken pot pie with gooey filling.

Next was a cheesecake pie with strawberries. Recipes: PIE CRUST and CHEESECAKE FILLING.

I would highly, highly recommend this pie crust recipe! As for the cheesecake filling, good luck if you try that recipe out. Mine ended up delicious, but all runny and weird (I think it was because I used fat free cream cheese. Gotta have your fat.).


Let me know if you try any of the recipes out! And stay tuned for some delicious baking recipes!

Friday, September 3, 2010

"Ya Mon!" - Our Jamaican Honeymoon (The Details)

So I'm going a teensy bit crazy waiting on our wedding pro photos. I mean, it's been over a month already! But you can't rush greatness, and I want to give Kelli alllll the time she needs to make our pictures pretty. But still. I want pictures! Sigh.

While we're waiting... here's the post I promised with honeymoon details. I looked super hard for a website with this sort of info before we went to Jamaica, and I never found one. So I figured I ought to create it, and hopefully other Sandals visitors will find it and think it's useful. So basically the purpose of this is to help people who Google search "Sandals information" looking for something like this, and you might find it pretty boring if you're not actually about to go to an all-inclusive resort. Sorry!

I've divided it into categories for your blog-reading pleasure, so feel free to scroll to a certain section if you're interested! (The Room, The Food, The Butlers, The Activities, The "Not Included" Things, and The Complaints)

Sandals Negril - The Details

The Room:
Our room was a "Honeymoon Beachfront one Bedroom Loft Suite," part of the Sunset Lofts. It came with butler service + 24-hour room service, which I thought was a MUST if you're going to Sandals Negril. It was really close to the beach with a great view.

The bottom floor (there's a TV and bar area across from the couch)

Cute little staircase!

View from the balcony.

Upstairs! Beautiful high ceilings!

Looking the other way...

The bathroom had a nice little bench thing and one of those great makeup mirrors. I loved it. 

View from the outside. We had the top two floors of a 3-story building.

The Food:
Sandals has many yummy places to eat. Here's the list:

Bayside - This is the centrally located buffet place. They have breakfast, lunch, and dinner. Breakfast ends at like 10:00am, and lunch doesn't start until 12:30. The breakfast was pretty good the one time we got up early enough to go, but lunch and dinner were eh. Most days we were still stuffed from breakfast at lunch time, so we ate here a lot so we could just get a little something.

At the Bayside for dinner...

Sometimes they had weird things like octopi.

The 4 C's - Italian! Loved this place. There's an appetizer buffet, and then you basically build you own pasta dish (picking from their big list of pastas, veggies, meats, and sauces). And they have yummmyyy desserts. :)

See... it's right on the beach!

Sundowner - Jamaican/Caribbean food! We went here for breakfast like every day. Get the pineapple pancakes. They're great. We went for dinner once too and it was lovely. This is one of two restaurants that require "resort evening attire," which I'm pretty sure just means the guys have to have collared shirts and the girls can't wear flip flops. We always sat in the outside section, but I think they had an air conditioned inside area. Great sunset views if you sit outside! Also they have a little waterfall/pond thing stocked with fish and big crabs and it's kind of fun to throw your bread at the fish and watch them go crazy. :)

At Sundowner!

Kimonos - This is the other "resort evening attire" restaurant, and the only restaurant that requires reservations, and also the only restaurant with air conditioning! It's a hibachi grill place, and it was SO, SO good. Mmmm. This was our favorite place to eat, and the hibachi chefs were so entertaining! Dinner reservations go fast (especially if you don't have a butler), so get a reservation as soon as you get there!

Barefoot by the Sea - Seafood! I really liked this one. Jeff got a conch soup that he loved. It's got a beautiful view of the sunset.


Sandals Cafe - A beach grill with burgers, grilled cheese, quesadillas, jerk chicken, etc. We ate lunch here a lot.


The Butlers:
I would not go to Sandals Negril without a butler. In the morning, all the butlers reserve beach chairs for their guests, and if you don't have a butler, you can't find beach chairs, or you get stuck with the beach chairs without a cabana thing and you get sunburn. The butlers give you a cell phone, which you can use to call them anytime 8am to 8pm.


For the restaurant that requires reservations, you only get a good reservation with a butler. People without butlers who asked for a reservation on Monday got one for like Friday at 9:00pm. We asked on Tuesday, and got one for Wednesday at 7:00pm. For the restaurants that don't require reservations, the butlers can still reserve you a table. If you don't have a butler, you have to wait in the dinner line to get a table (30minutes-ish). If you do have a butler, they walk you right past the waiting people and straight to your table.  And your table has flowers and candles on it.

Before you go, you fill out a butler preference sheet. On ours, we put that we wanted to make sure our in-room bar had SoCo, and we wanted champagne every night. Good choices. :) All day, the butlers bring drinks to their guests at the beach. Even if you don't ask for them. It's great. Most nights they come put flower petals and the bed and leave you extra dessert.


The Activities:
Sandals has lots of activities. There's watersports (snorkeling, kayaking, sailboats, hydrobikes, etc.), all free. Every night there's some sort of entertainment. One night we had a "Memories of Africa" production by the entertainment staff. One night there was a beach party thing. One night there was a couples' game show. One night was the Jamaican Independence party and show. They have a fitness center and tennis courts and stuff too, but we didn't use those much. 

The "Not Included" Things:
So Sandals calls itself an "all-inclusive" resort, and it is (mostly). There are some exceptions though. First of all, any excursions you book are an extra charge (leaving the resort to go to waterfalls, etc.). We just stayed at the resort the whole time and LOVED it. If you do plan on leaving the resort, we heard its cheaper to book your activities through someone other than Sandals.

Romance Packages - Sandals constantly tries to get you to buy assorted "romance" packages. There's one with a firepit and s'mores. There's one with a private sunset dinner on the beach. There's on with champagne and stuff in your suite (although if you have a butler, that's free!). The fancy upholstered cabana things on the beach with the curtains and all are rentable by the day.

Photos and Spa - People are constantly taking pictures of you. Then they want you to go to the photo office and buy them. We figured out pretty quick to just tell the guys that we already took pictures, and then they stop asking. The spa people continually find you and ask you if you want to book spa treatments. It's kind of annoying.

Food and Drink - Most of the food and drinks are included, but there's a small tray of stuff in your suite that you pay for if you eat it. You get a whole fridge and in-room bar full of free stuff though, so it's okay. Just don't eat the peanuts unless you want to pay $15 for them. Also, beware of the wine. Beringer    wines are free, but they'll try to get you to order other wines at some of the restaurants, and you'll have to pay for those.

Tips - They say that Sandals employees aren't allowed to accept tips. It works really well... the bartenders/waitstaff/housekeeping/etc. tips are already included in your room price. BUT... the people that take your luggage at the Sandals lounge at the airport and the people who do the bus transfers aren't directly employed by the resort, and they will expect tips (and ask for them if you don't give them one). Also the butlers have to be tipped separately.

The Complaints:
SOOO few complaints. We loved it really. There were really only two things that bothered me. One was the people walking up and down the beach. I guess Sandals can't legally stop people from walking onto the beach, so there were CONSTANTLY people trying to get us to buy conch shells/cigars/parasail rides/hair braids and playing music for tips. They never came up onto the beach, so we started just sitting in the second row of beach chairs so they'd bother the people in front of us.

The only other thing is that we had to leave INSANELY early to get to the airport when we left. Sandals tries to send as few buses as possible to the airport, and we apparently got grouped with a bunch of people whose flights left way before ours. Our flight was at like 1pm, and we left Sandals at 7am. So we made it to the airport around 8am, and the Continental desk didn't even open for another 2 hours. So we had to sit on the floor and wait for two hours, and then sit inside the terminal and wait some more. It was disappointing because we thought we'd have time to eat breakfast and sit on the beach a little before we left, but instead we had to leave before any of the restaurants even opened.

THE END.


Phew. Sorry for the huge novel of a post.