Friday, June 28, 2013

A Few Announcements

I have a few announcements for you today...

1. Cardstore Giveaway!
The Cardstore giveaway for a free personalized photo greeting card ends tonight! 

IMG_6904

Do you want an adorable free card? Enter here! There aren't too many entries yet, so if you're one of those people who never wins anything, this could be your chance!

2. Switch Your Feed Reader!

Google Reader dies on Monday. So if you're following via Google Reader or Google Friend Connect (or if you're not, but you'd like a nice way to consolidate all of your blog reading), you may want to switch to a different feed reader! I really like Feedly (and it's super easy to switch over), but Bloglovin is a good option as well. 

follow us in feedly
Follow on Bloglovin

3. New Blog Layout!

I re-did my blog design and layout recently, so if you're using Feedly/Google Reader/whatever, you might want to click over and check it out! I'm kind of proud of it because I did all the html edits and graphic design myself, and I really like the new color scheme! 


Y'all have to let me know what you think of the new layout! :)

Thursday, June 27, 2013

Roasted Garlic & Herb Red Potatoes

I don't make potatoes very often, but when I do, I make them this way. I can't stand the texture of mashed potatoes, but roasted like this? Totally different. Something about these just tastes like a traditional family dinner (I think it's the rosemary?), which makes me smile! 

IMG_3979
Pin It

Recipe loosely based on this one and this one.

Ingredients:
12 baby red potatoes
3 tbsp olive oil
1 tbsp rosemary
1/2 tsp pepper
1/2 tsp oregano
1/2 tsp thyme
1/2 tsp paprika
salt to taste
4 cloves garlic, minced

Directions:
1. Cut potatoes into wedges.
2. In a large bowl, toss potato wedges with all other ingredients. Mix until all potatoes are coated.
3. Cover a baking sheet with foil. Spread the potatoes out in a single layer on the baking sheet, skin-side-down. 
4. Roast at 425 degrees for 30-35 minutes

IMG_5697
(tossing in a bowl)

IMG_5763
(coated potatoes)

IMG_5804
Ta-da!
Enjoy!

Wednesday, June 26, 2013

Organizing our First Aid Supplies

As part of my March Spring Cleaning Checklist, I organized our First Aid Supplies with 30 minutes and 4 easy steps!

Step One: throw out expired medications.

Step Two: get a container that maximizes the space you have to work with.

Step Three: corral tubes and smaller items in plastic cups so they don't get buried by larger medication bottles.

Step Four: label bottles and boxes so you can tell what they are from the top.

Ta-da! An organized First Aid basket!

IMG_4232

We have a little cabinet above the toilet in our bathroom.

IMG_4211

IMG_4212

In there we keep all of our First Aid stuff (band-aids, medicines, etc.). 

IMG_4214

But the First Aid basket was overflowing, and it was just a mess every time we had to dig through it to get something out.

IMG_4215

So I set out to clean out the basket and figure out a better solution! The first step was to get rid of all the expired medications. I haven't done that in way too long apparently, because I found a bottle of ibuprofen that expired in 2008 (aka, two years before we even got married!).

IMG_4217

After that, I consolidated things. We had about five boxes of Band-Aids, all half-full. So I piled them all into just two boxes, and ripped off the top cardboard flaps to make them easy to get to! 

IMG_4221

I corralled all the little tubes and smaller stuff (gauze, alcohol wipes, etc.) in clear plastic cups. These sorts of things were always falling to the bottom of our old basket, making us have to dig for them and mess up everything us. But now they stay upright in the cups and we can easily reach everything! 

IMG_4218

IMG_4229

Most importantly, I found a new basket that would maximize the space on the shelf in the cabinet. It's a bit bigger than our old one (and doesn't have slopey sides that waste space) so everything fits nicely! There's even a little space to grow into! The plastic cups and all the medications went into the basket, and I was done! 

IMG_4232

My favorite part of this little project is the labels on the medicine containers. I used the kraft paper stickers from Target's Dollar Spot and labelled each medication so we can easily see what it is from the top. No more fumbling around, pulling out bottle after bottle until you finally find the Advil! 
Now it fits perfectly in our cabinet, and it's easy to use! Plus, we're no longer in danger of ingesting ibuprofen from 2006. :)

IMG_4279

Pin It

Tuesday, June 25, 2013

China Cabinet Change-Up

First of all - I'm interrupting the regularly-scheduled programming here for a second. A sweet friend of mine asked me to share this:

"I was hoping you could help out my family/step sisters. They came to us last year that their dad was sexually molesting them. After the past year our judge sent them back to their dads this summer and doesn't believe them. We started a petition for the judge to listen! Please share with friends and family to sign and protect my sisters. http://www.change.org/petitions/please-help-protect-us-from-our-physically-and-sexually-abusive-dad"

Natalie & Olivia

Obviously I don't know the details of what's been going on here, but they're hoping to get enough signatures to convince the judge to take another look at the case. If you'd like to sign the petition, just click the link above, but at the very least, please keep this sweet family in your prayers.

Okay, now moving on to much less important things...

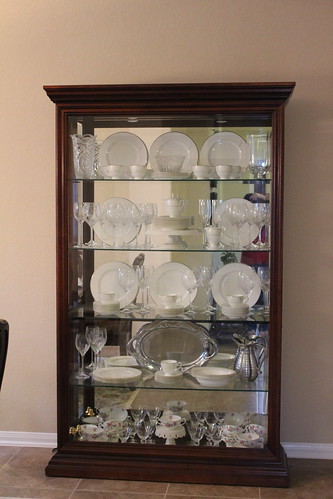
When we first moved into the house (two years ago this week!), one of the first things I did was set up our china and crystal in our china cabinet. For two years, it looked like this, with all the place settings in neat little rows:


But at some point I saw this post on china cabinet styling, and I loved the whimsical, artful look of not putting the dishes in their neat little place settings:


So I decided to get creative with my own china cabinet! We have lots of pretty dishware that was just hiding in cabinets in the kitchen, so I pulled out some of my favorite vases, a platter, a cake plate, and a few other things, along with the vintage dishes from Aunt Lucy, to add to the china cabinet.

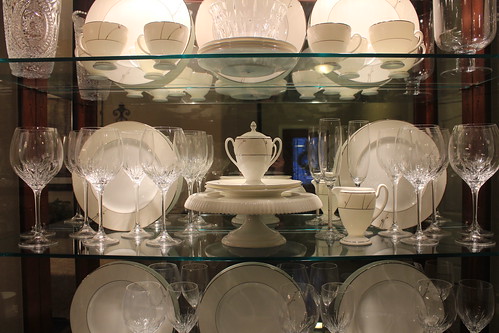
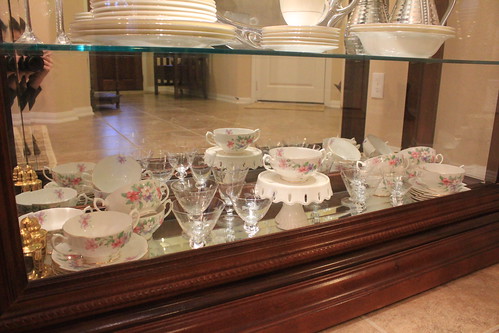
And then I just messed with it. I took everything out and then put everything back in slowly, rearranging as I went. And now it looks like this:

IMG_5461

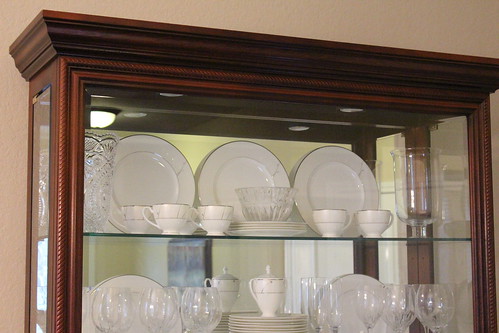
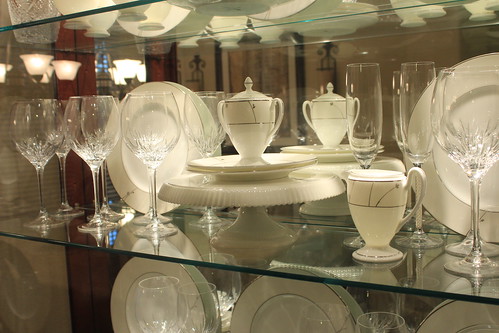
The top shelf has a couple vases (both wedding gifts), three dinner plates, a few salad plates, some teacups, and a pretty crystal bowl.

IMG_5462

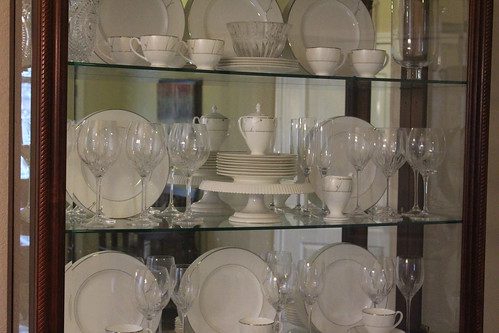
The little sugar bowl is my favorite piece from our entire china collection, so it went front-and-center on the second shelf, along with two more dinner plates, most of the crystal glassware, a cakeplate (a wedding gift from my sisters), the rest of the salad plates, the champagne flutes from our wedding, and the little cream pitcher of course! 

IMG_5463

IMG_6097

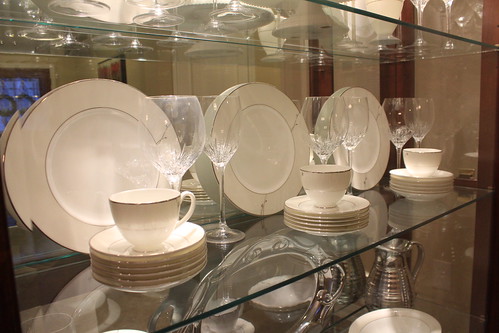
The third shelf looks pretty traditional still - dinner plates, teacups, all the saucers, and some glassware.

IMG_6085

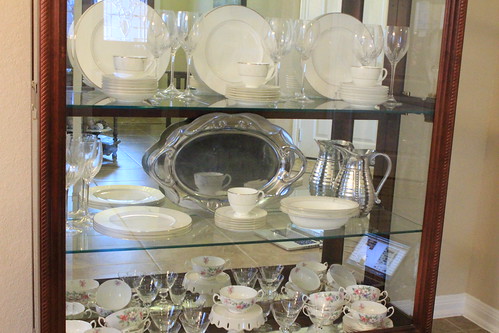
The fourth shelf ended up with the rest of the china and glassware, along with a silver pitcher and platter (both wedding gifts).

IMG_5481

IMG_6093

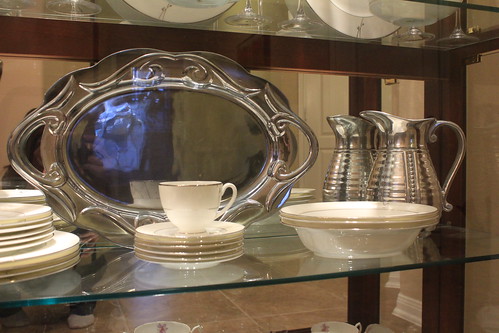
And on the bottom row: the soup bowls, dessert dishes, and salt and pepper shakers from Aunt Lucy, along with a tiny little cakeplate (a gift from my friend Kristen):

IMG_6086

When we got married, I was kind of nervous about picking china and crystal that I'd have forever. I was only 20 at the time, and I stressed over it a lot to make sure we picked something we'd love for a long time. There were a lot of trips to Macy's. Jeff and I didn't exactly have the same tastes in china either, so I spent a lot of time trying to choose a simple, classic pattern that we'd both be happy with for the long haul.

I think we did well though. I still absolutely love it, and I don't see that changing any time soon. We actually use our china at least a handful of times a year (and the china cabinet always looks sad and empty when we do! haha!), and sometimes I drink my morning coffee with a china teacup and saucer just because I can. :) My sweet grandparents bought all twelve place settings for us, and the other pieces and crystal also came from beloved family and friends, and it's just so special to me that we can celebrate special occasions with the china we received from people we love. 

IMG_6110

IMG_6118

IMG_6120

So what do y'all think? For the first couple days after I rearranged everything, I really felt like I had ruined it. But then I kind of started to like it. Jeff likes it, but I don't know. I'm considering switching it back to the way it was. Thoughts?

Pin It

Monday, June 24, 2013

Cheesy Chicken, Veggie, & Rice Casserole

I love this recipe. It can serve it crowd. It can feed picky eaters. It can be made ahead of time and frozen. It's easy to make for a family who just had a baby or something. I've made it four times in the last couple months, which is a TON for me (I normally don't like to repeat recipes)! It's tasty, and it doesn't even have any of those "cream of ____" soups in it! 

IMG_6660
Pin It

Recipe adapted from here.

Ingredients:
3 tbsp olive oil
1 medium onion, diced
5 stalks celery, diced
4 carrots, peeled and diced
2 tbsp minced garlic
2 cups shredded, cooked chicken (rotisserie chicken meat works great!)
2 cups steamed white rice
2 packages Uncle Ben's w"long grain & wild" Ready Rice, prepared
1/2 tsp salt
1 tsp pepper, divided
1/4 tsp garlic powder
4 tbsp butter
1/4 cup flour
2 cups low-sodium chicken broth
3 1/2 cups shredded cheddar cheese, divided

Directions
1. Heat oil in a really big skillet over medium heat. Saute onion, celery, and carrots until tender (10-12 minutes). Stir in garlic and cook for one more minute. Stir in chicken, both rices, salt, 1/2 tsp pepper, and garlic powder. Reduce heat to low.
2. In a separate medium saucepan, melt butter over medium-high heat. Whisk in flour and 1/2 tsp pepper. Pour in chicken broth, whisking continuously. Whisk until thick and starting to boil. Stir in 2 cups cheddar cheese and stir until melted. 
3. Pour cheese sauce into rice mixture, then transfer to a 9x13 baking dish.
{if you want to freeze it, cover and freeze at this point - thaw before continuing}
4. Top with 1 1/2 cups shredded cheddar.
5. Bake at 350 for 25-30 minutes, or until cheese is melted through.

IMG_3948
(this is the wild rice I use, but any prepared wild rice will probably do)

IMG_3950
(sauteed veggies)

IMG_3952
(chicken)

IMG_3959
(chicken and rice added)

IMG_3960
(cheese sauce)

IMG_3962
(cheese sauce added in)

IMG_3963
(in the 9x13...)

IMG_3968
(cheese on top)

IMG_3980
(all done!)

IMG_3995
Ta-da!

Enjoy!