Thursday, February 28, 2013

The New Kitchen Table!

Up until recently, our kitchen breakfast nook area looked like this:


The table was a hand-me-down from my parents that we've had since before we were married. When we first got it, it looked like this:

(move-in day for our old apartment)

We painted the white parts black pretty quickly, and we were pretty happy with the result:


When we bought our current house, we figured we'd replace the table with something new and more our style. But there were so many other rooms to tackle first (like the completely empty dining room and piano room, then the guest room and the other guest room, and then our bedroom). After all, at least the kitchen had furniture in it and looked "done." 

We honestly weren't planning on looking for a new table until the master bedroom and craft room were done (which still hasn't happened), but we happened to stop by World Market during a big furniture sale, and I immediately loved the chunky-but-pretty pedestals of this rustic table & chairs:

World Market's Arcadia Collection

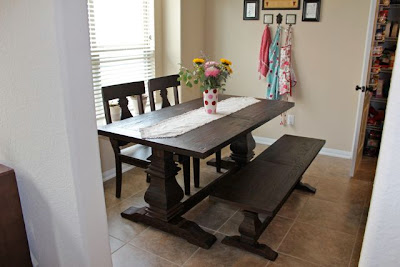
Thanks to the big sale that was going on, a coupon we had, and an American Express gift card (a rebate from my new camera purchase), we were able to buy the entire set in the picture (table, 4 chairs, and a bench) for just $135! Our kitchen went from this...


To this!


We're really happy with it. The dark wood matches the kitchen cabinets and the dining room table in the adjoining room SO much better than the old table ever did. 

(I should really stop taking photos at midnight... but you get the picture)

I really wanted to have a bench on that side of the table because of the layout of the room. This is a horrible photo, but you can see how the room is kind of long with the kitchen table area stuck on one end...


With the high-backed chairs we had before, I felt like the chairs just cut that section of the kitchen off from the rest of the room and made it seem like two smaller rooms. Now, the bench makes everything look more open and connected, like one big room. I love it!


I love the rustic look of the table. Rustic isn't normally my thing, but in this case I just liked it!


If the table gets scratched or whatever in the future, I think it will just add to the character of it, so it will hopefully be a great long-term piece of furniture, despite its small price tag. Plus, it's just pretty. :)


There are two more chairs and two leaves that go on each end of the table, but it's a little cramped in that space when you include everything, so for now we're leaving it without the leaves, and the extra chairs are hanging out in the game room upstairs. It's nice to have them all though in case we ever need to seat 6+ people there. Generally we just eat in the dining room if we have more than four people though.

I found a pretty little linen runner at HomeGoods the other day and added it to the table, and I think it does a great job of breaking up all the dark. 


So, that's it! Yay new table! What do y'all think?

Pin It

Wednesday, February 27, 2013

Chicken Pot Pie

I generally like to try out new recipes rather than continually repeating old ones, but there are a few recipes that I can't help but come back to again and again. Chicken pot pie is one of them. I use a recipe from my Aunt Suzanne, which I posted on the blog ages ago, but that was back before I posted recipes regularly, and I never took good photos, and I know I have a TON of new readers since then, so I thought I'd revisit it and share it again. It's super simple and great comfort food! 

Pin It

Recipe from my Aunt Suzanne.

Ingredients:
1 small onion, diced
1 tsp minced garlic
2 tbsp butter
1 rotisserie chicken, deboned and shredded
1 bag mixed veggies, cooked (I use the "California blend" of carrots, broccoli, and cauliflower)
1 can cream of mushroom soup
1 can cream of chicken soup
Italian seasoning, to taste
black pepper, to taste
2 9-inch refrigerated pie crusts
1 egg white

Directions:
1. Heat butter in a large skillet. Saute the onion and garlic until the onion is translucent.
2. Add chicken, soups, and spices to the skillet. Mix to combine.
3. Place 1 pie crust in the bottom of a lightly-greased pie pan. Spoon in chicken mixture and top with remaining pie crust. Fold and shape the edges and cut slits in the top crust.
4. Put the egg white in a small bowl, then brush it on the top pie crust.
5. Bake at 350 for 35 minutes. Let sit for 15 minutes before serving.

(bottom pie crust)

(veggie blend)

(diced onion)

(chicken deboned and shredded)

(adding chicken, veggies, and soups)

(mixing it all up...)

(filling in the pie crust)

(top crust...)

(edges crimped)

(pretty slits in the top)

(egg white)

(egg white brushed on the top)

(all done!)

(yummy chicken pot pie!)

Ta-da!

Enjoy!

Thursday, February 21, 2013

Zucchini Sausage Casserole

Okay, so I forgot to take a picture of the finished product for this one, but I'm sharing it anyway because it's so yummy! Zucchini is a new favorite of mine (I thought I hated it for years, but apparently I actually like it), and this casserole is a great way to use it!

Pin It

Recipe adapted from here.
Ingredients:
1 lb pork sausage
4 medium zucchini (halved lengthwise and cut into 1/4-inch slices)
1 can condensed cream of chicken soup (10 3/4 oz)
8 oz sour cream
4 cups chicken-flavored stuffing mix
1/3 cup butter, melted

Directions:
1. In a large skillet, cook sausage over medium heat until browned. Drain off fat and return to skillet.
2. Add zucchini to skillet. 
3. In a small bowl, combine soup and sour cream. Stir the mixture into the sausage mixture.
4. In a large bowl, combine stuffing mix and melted butter. Put half the stuffing mixture into the bottom of a lightly-greased 3-quart baking dish. 
5. Spread the sausage mixture over the stuffing. Add the remaining stuffing mixture on top. 
6. Bake, covered, for about 30 minutes (or until heated through).

(sausage and zucchini)

(soup + sour cream)

(ready for the oven...)

(butter + stuffing)

(stuffing in the bottom...)

(sausage mixture in the middle...)

[MISSING PHOTO OF CASSEROLE WITH THE OTHER HALF OF THE STUFFING ON TOP]
Oops. 

[MISSING PHOTO OF CASSEROLE FINISHED!]
Oops.

Enjoy!

Wednesday, February 20, 2013

Oatmeal Chocolate Chip Banana Bread

Mmm, bread. Bread is my favorite food group. And when I have a few bananas in the fridge that are getting brown spots, banana bread is my favorite part of my favorite food group!

Pin It

Recipe adapted from here.

Ingredients:
2 cups white whole wheat flour
1 cup old fashioned rolled oats
1/2 cup sugar
1/2 cup brown sugar
2 tsp baking powder
1 tsp baking soda
1 tsp cinnamon
1/4 tsp salt
1 1/2 cup buttermilk
2 eggs, beaten
1/4 cup butter, melted
3 bananas, mashed
3/4 cup semi-sweet chocolate chips

Directions:
1. In a large bowl, whisk together flour, oats, sugars, baking powder, baking soda, cinnamon, and salt.
2. In a medium bowl, mix buttermilk, eggs, butter, and bananas. Pour mixture into dry ingredients and mix until well combined. Stir in chocolate chips.
3. Pour batter into two lightly greased 9x5 loaf pans (or one loaf pan and a muffin tin!) and bake at 350 for 45 to 50 minutes (or until a toothpick stuck in the middle of the loaf comes out clean. Muffins take about 20 minutes.

(wet ingredients)

(dry ingredients)

(adding chips to the mixture)

(ready for the oven!)

(mufins ready for the oven!)

(all done!)

(mmmm!)

Ta-da!

Enjoy!