You guys. I have successfully completed my first furniture restoration project, and it was SO FUN!
Before: this chair from Craigslist with a scratched wood finish and a stuffing-poking-out seat...
After: the perfect little chair for our piano room!
This project really was pretty simple. I probably spent about three hours on the whole entire thing. I think anybody can refinish furniture! Believe me... if I can do it, you can do it! Here's the play-by-play of how it all went down.
Step 1: Locate screws on the chair's underside.
Step 2: Remove those screws, and watch your seat come right off.
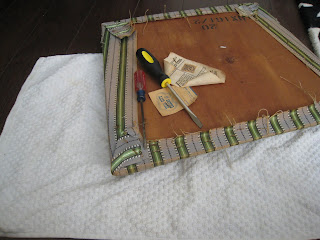
Step 3: Pry the upholstery staples out with a thin flathead screwdriver (if your staples are old and rusty like mine, you might want to put a cloth or newspaper underneath).
If you end up with staples like this, it's okay. You just want to get the fabric off.
Step 4: Remove the fabric. Watch out for pointy staples!
Step 5: Pull out the staples with needlenose pliers.
Step 6: Assess the condition of your seat. At this point you might want to add new batting/cushion. Or, if you're like me, you'll decide that what's there already is just fine and move on.
Step 7: Lay the old seat fabric out on your new fabric and cut around it (cutting a piece about 2 inches wider on all sides, just in case).
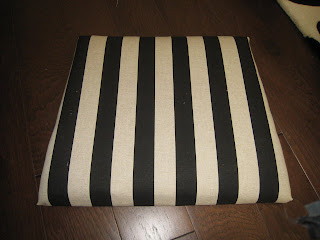
Step 8: Lay your seat on top of your new fabric, pull the fabric tight around the sides, and staple with a heavy-duty staple gun. If you find that it isn't quite tight enough, just pull it tighter and staple again (you can see where I did that on the left side). Fold the corners like you would a bedsheet to get a crisp edge.
Step 9: Admire your pretty new seat!
Step 10: Put the seat on the chair and admire some more!
Step 11: Get some sandpaper (medium to fine grit... I used fine, but I'm kind of terrified of splinters and medium would've probably been okay) and sand down the chair. You want to rough it up enough that paint will stick... you don't need to go down to the bare wood, just get rid of the shiny finish. You'll probably want a mask of some sort over your face to avoid inhaling to sanded particles (or, if you're like me, a damp kitchen rag will work just fine!).
Step 12: Step back and look at how funny your chair looks all covered in sanded dust. Then (this is important!!!), wipe down the chair with a damp cloth to get rid of dust particles.
Step 13: Take the chair out to the empty lot next door for some painting! Or, if you don't have an empty lot next door, any paint-friendly area will work. :o)
Step 14: Spray paint the chair in thin, even coats to get a nice solid coverage!
Step 15: Let the paint dry completely (don't leave it outside because dust or dirt will blow on it).
Step 16: Reattach the seat with the screws.
That's it! It was so easy! I'm so happy with how the chair looks now! He's a perfect little addition to the piano room!


So pretty! Furniture restoration is my favorite - It's such a huge change for not much work!
ReplyDeleteit looks SO great! i love it! i want to try this now
ReplyDeleteAwesome job, it looks great! And, oh my, you have a new look on the blog - I haven't been over here from my Reader in a bit!
ReplyDeleteI'm super impressed, the chair looks awesome! As does the blog.. finally clicked over from my reader! Love the layout :)
ReplyDeleteI must say, "IT is so elegant". You really made me so happy for giving this chair a new life! Can you do me a favor? Please continue being awesome!:)
ReplyDelete